Building and deploying a chatbot with Azure Functions OpenAI Extension and model GPT-4o mini

Overview
Introduction
In this blog post, we will explore how to integrate Azure Functions with the OpenAI extension. This integration allows you to use triggers and bindings with the powerful capabilities of OpenAI within your serverless functions. We will walk through the setup, configuration, and deployment of an Azure Functions project that uses the OpenAI extension, using Bicep templates for infrastructure as code.
Prerequisites
Before we begin, ensure you have the following tools and resources:
- .NET 8 SDK
- Azure Functions Core Tools
- Azurite (for local Azure Storage emulation)
- Azure CLI
- Azure Developer CLI (azd)
- An Azure subscription. If you don't have one, you can sign up for a free Azure account.
Project Structure
Link to GitHub project
The project is organized as follows:
 1azure.yaml
 2infra/
 3    core/
 4        ai/
 5        host/
 6        monitor/
 7        security/
 8        storage/
 9    main.bicep
10    main.parameters.json
11src/
12    AzureFunctionsOpenAIExtension.csproj
13    AzureFunctionsOpenAIExtension.sln
14    Chat.cs
15    Models/
16    Program.cs
17    host.json
18    local.settings.json
Infrastructure Deployment
The infrastructure is defined using Bicep templates located in the infra directory.
Deploy the Infrastructure using azd
Navigate to the root of your project and run:
1azd up
This command will deploy all the necessary resources defined in the main.bicep file.
The azd outputs the progress of the provisioning. If everything succeeds an endpoint of the Function app is shown.
 1  (✓) Done: Resource group: rg-dev
 2  (✓) Done: Log Analytics workspace: asarash7gvzhctfaxmbm
 3  (✓) Done: Storage account: starash7gvzhctfaxmbm
 4  (✓) Done: App Service plan: plan-arash7gvzhctfaxmbm
 5  (✓) Done: Application Insights: appi-arash7gvzhctfaxmbm
 6  (✓) Done: Portal dashboard: arash
 7  (✓) Done: Azure OpenAI: cog--7gvzhctfaxmbm
 8  (✓) Done: Function App: func-arash7gvzhctfaxmbm
 9
10Deploying services (azd deploy)
11
12  (✓) Done: Deploying service api
13  - Endpoint: https://func-arash7gvzhctfaxmbm.azurewebsites.net/
14
15
16SUCCESS: Your up workflow to provision and deploy to Azure completed in 2 minutes 50 seconds.
Using the Chat function
Now that our infrastructure is set up, let's use the chat function that will interact with OpenAI.
Test the Function Locally
Run the function locally using the Azure Functions Core Tools. First navigate to the src directory.
1cd src
Add the following settings to local.settings.json:
 1{
 2  "IsEncrypted": false,
 3  "Values": {
 4    "AzureWebJobsStorage": "UseDevelopmentStorage=true",
 5    "FUNCTIONS_WORKER_RUNTIME": "dotnet-isolated",
 6    "AZURE_OPENAI_ENDPOINT": "<your-openai-endpoint>",
 7    "AZURE_OPEN_KEY": "<your-openai-key>",
 8    "CHAT_MODEL_DEPLOYMENT_NAME": "<your-chat-model-deployment-name>"
 9  }
10}
Start the host:
1func start
The terminal outputs the available functions to call:
1Functions:
2
3  Completions: [POST] http://localhost:7071/api/Completions
4
5  CreateChatBot: [PUT] http://localhost:7071/api/chats/{chatId}
6
7  GetChatState: [GET] http://localhost:7071/api/chats/{chatId}
8
9  PostToChatBot: [POST] http://localhost:7071/api/chats/{chatId}
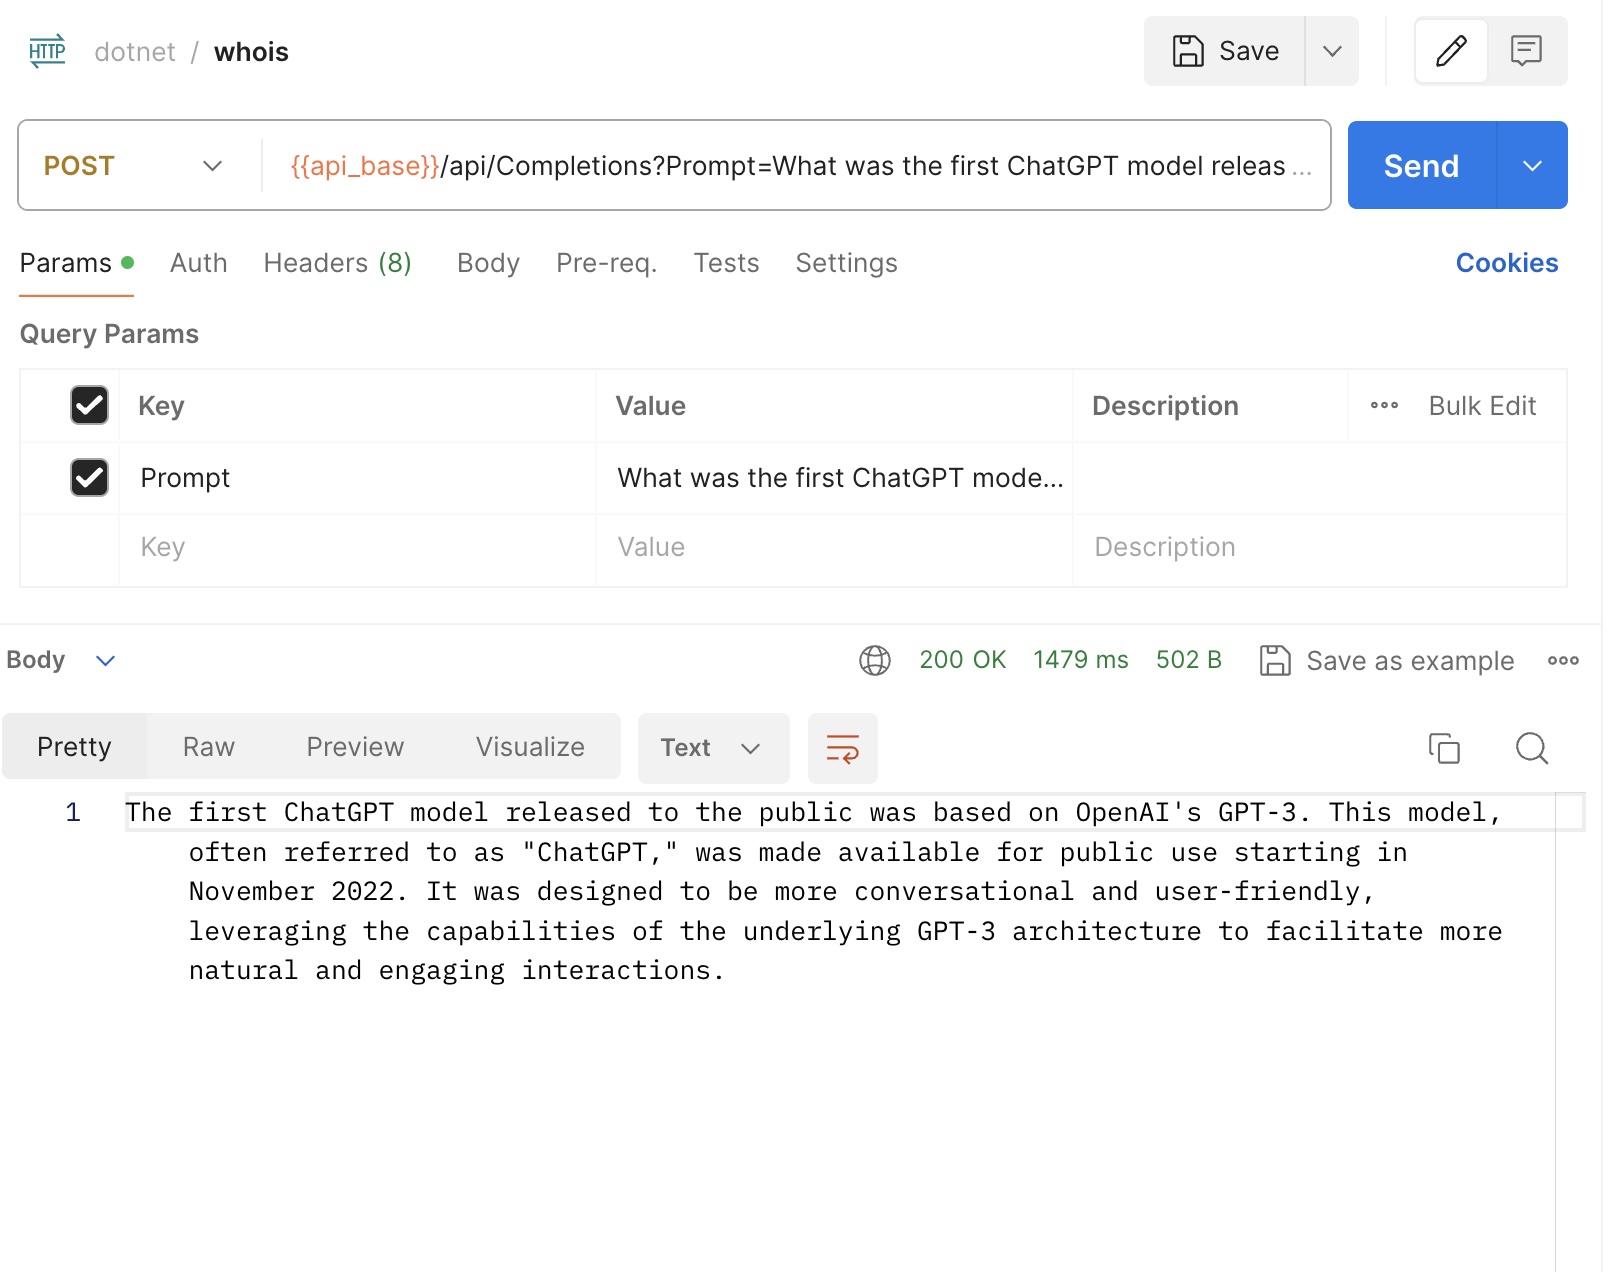
You can test the function using a tool like curl or Postman. When calling the Completions API the response will be like this:
Verify the Deployment with Function app endpoint
After the deployment is complete, you can verify it by making a request to the function's endpoint. Replace <YourFunctionAppName> with the name of your Function App. To call the endpoint of the function app an app key needs to be included in the request. The app key can be found by going to the Azure portal and locating the deployed function app and then App keys.
Example Calls
Here are some example calls you can make to the deployed function:
-
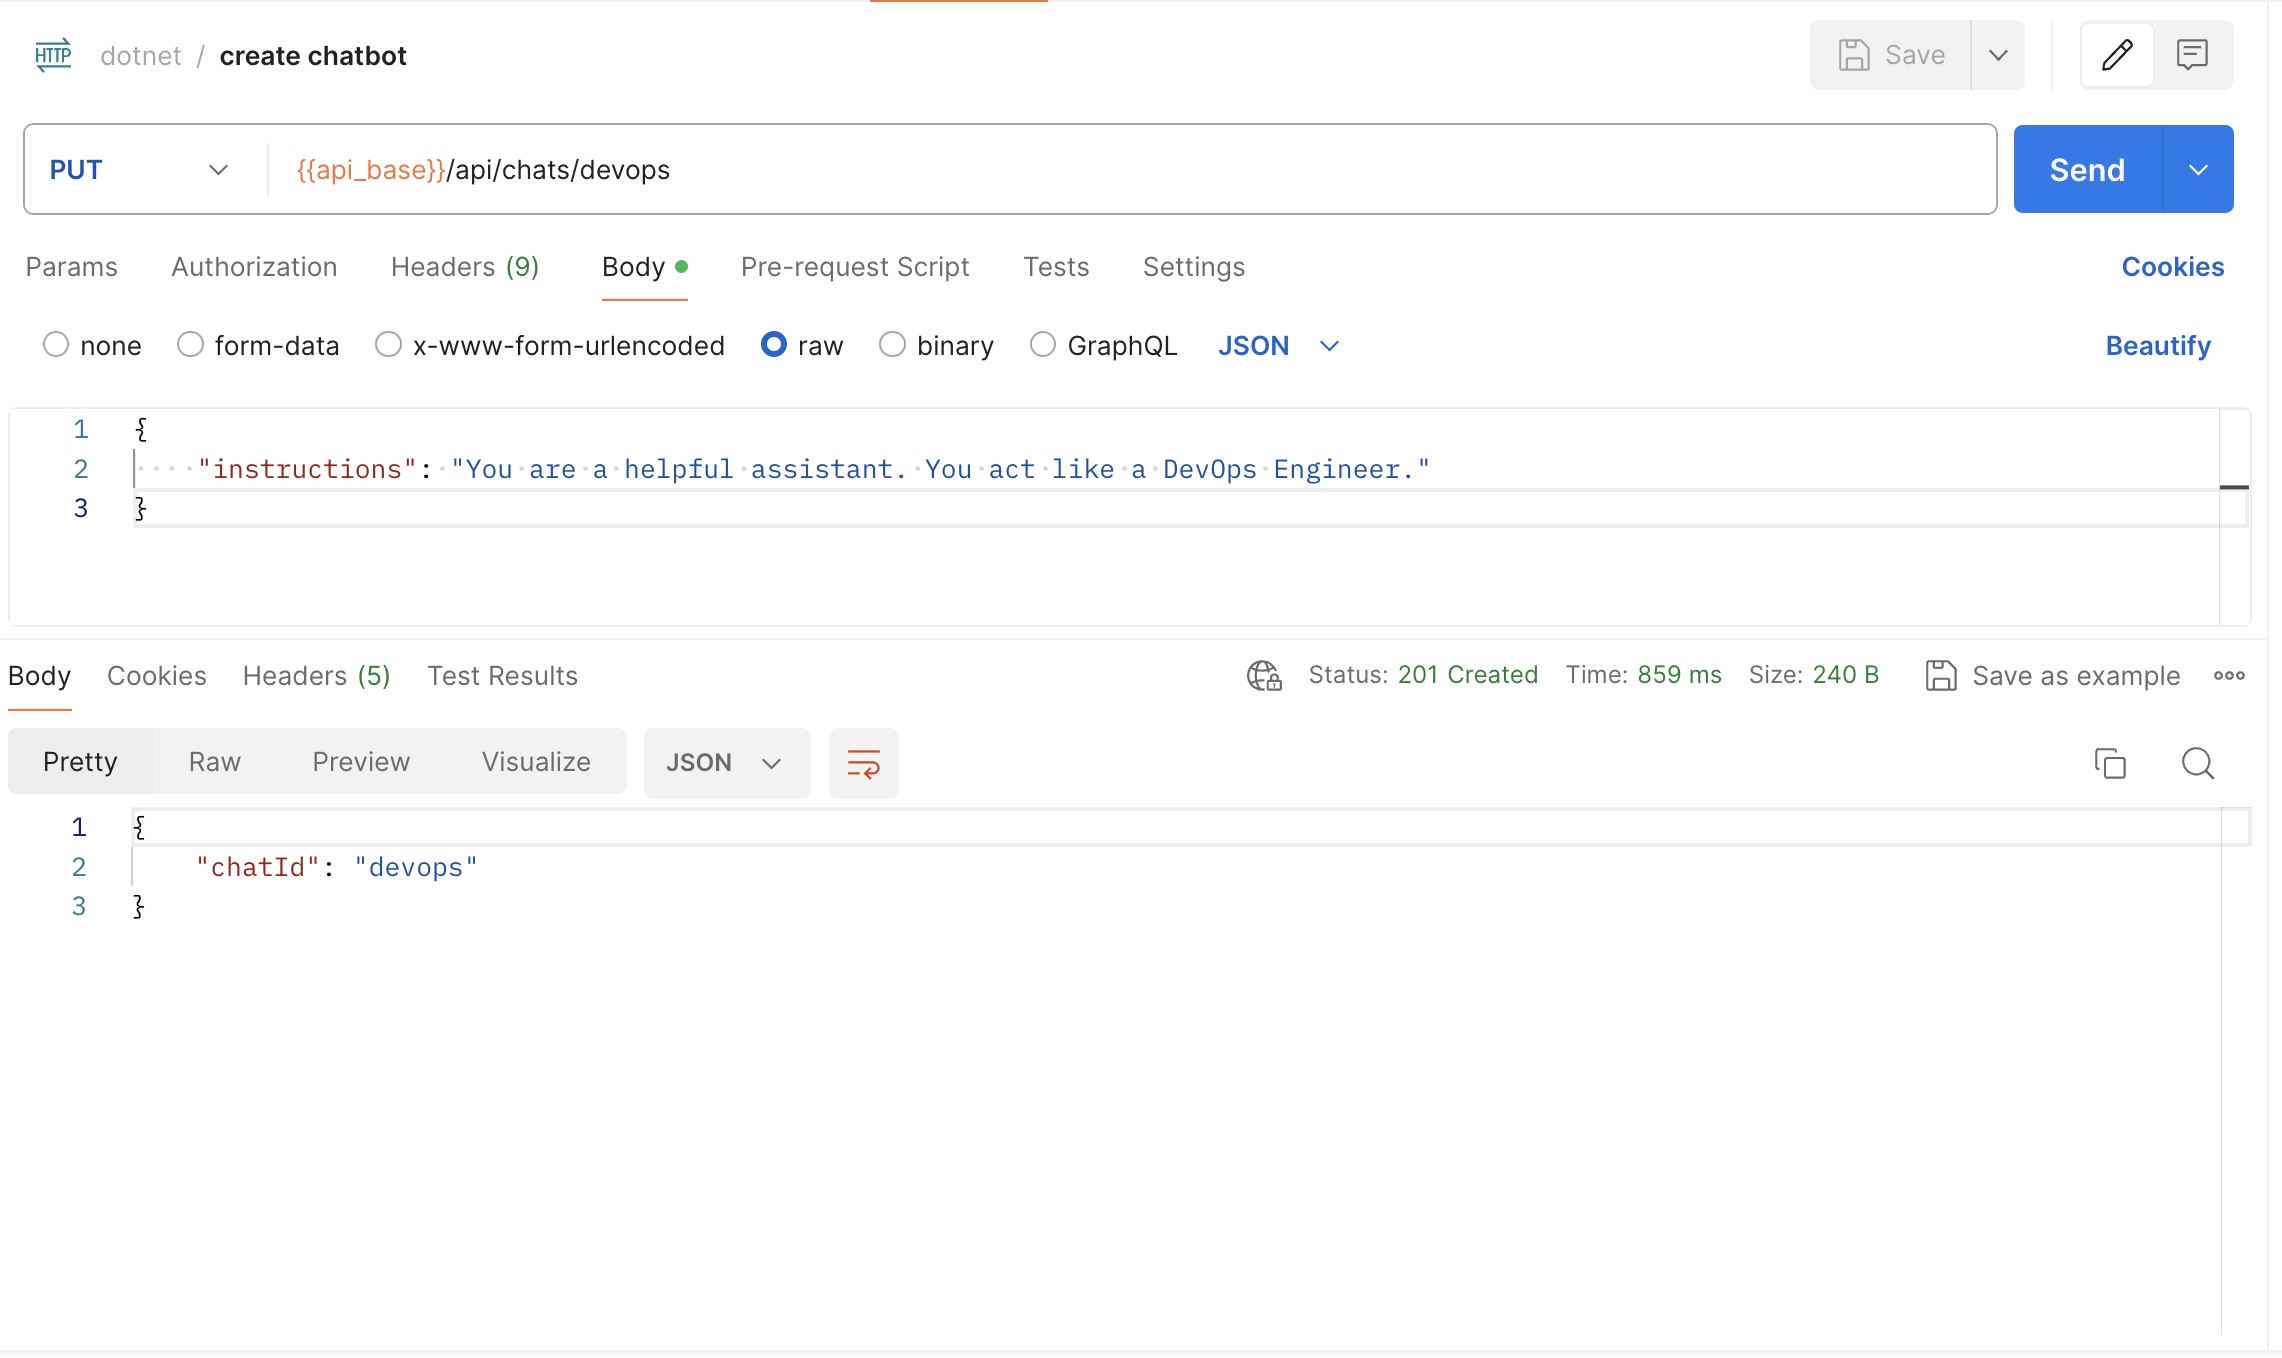
Create a chat bot:
- HTTP Method: PUT
- Endpoint:
/chats/{chatId} - Request Body:
1{ 2 "instructions": "You are a helpful assistant. You act like a DevOps Engineer." 3} - Response:
- Status Code: 201 (Created)
- Body:
1{
2  "chatId": "{chatId}"
3}
-
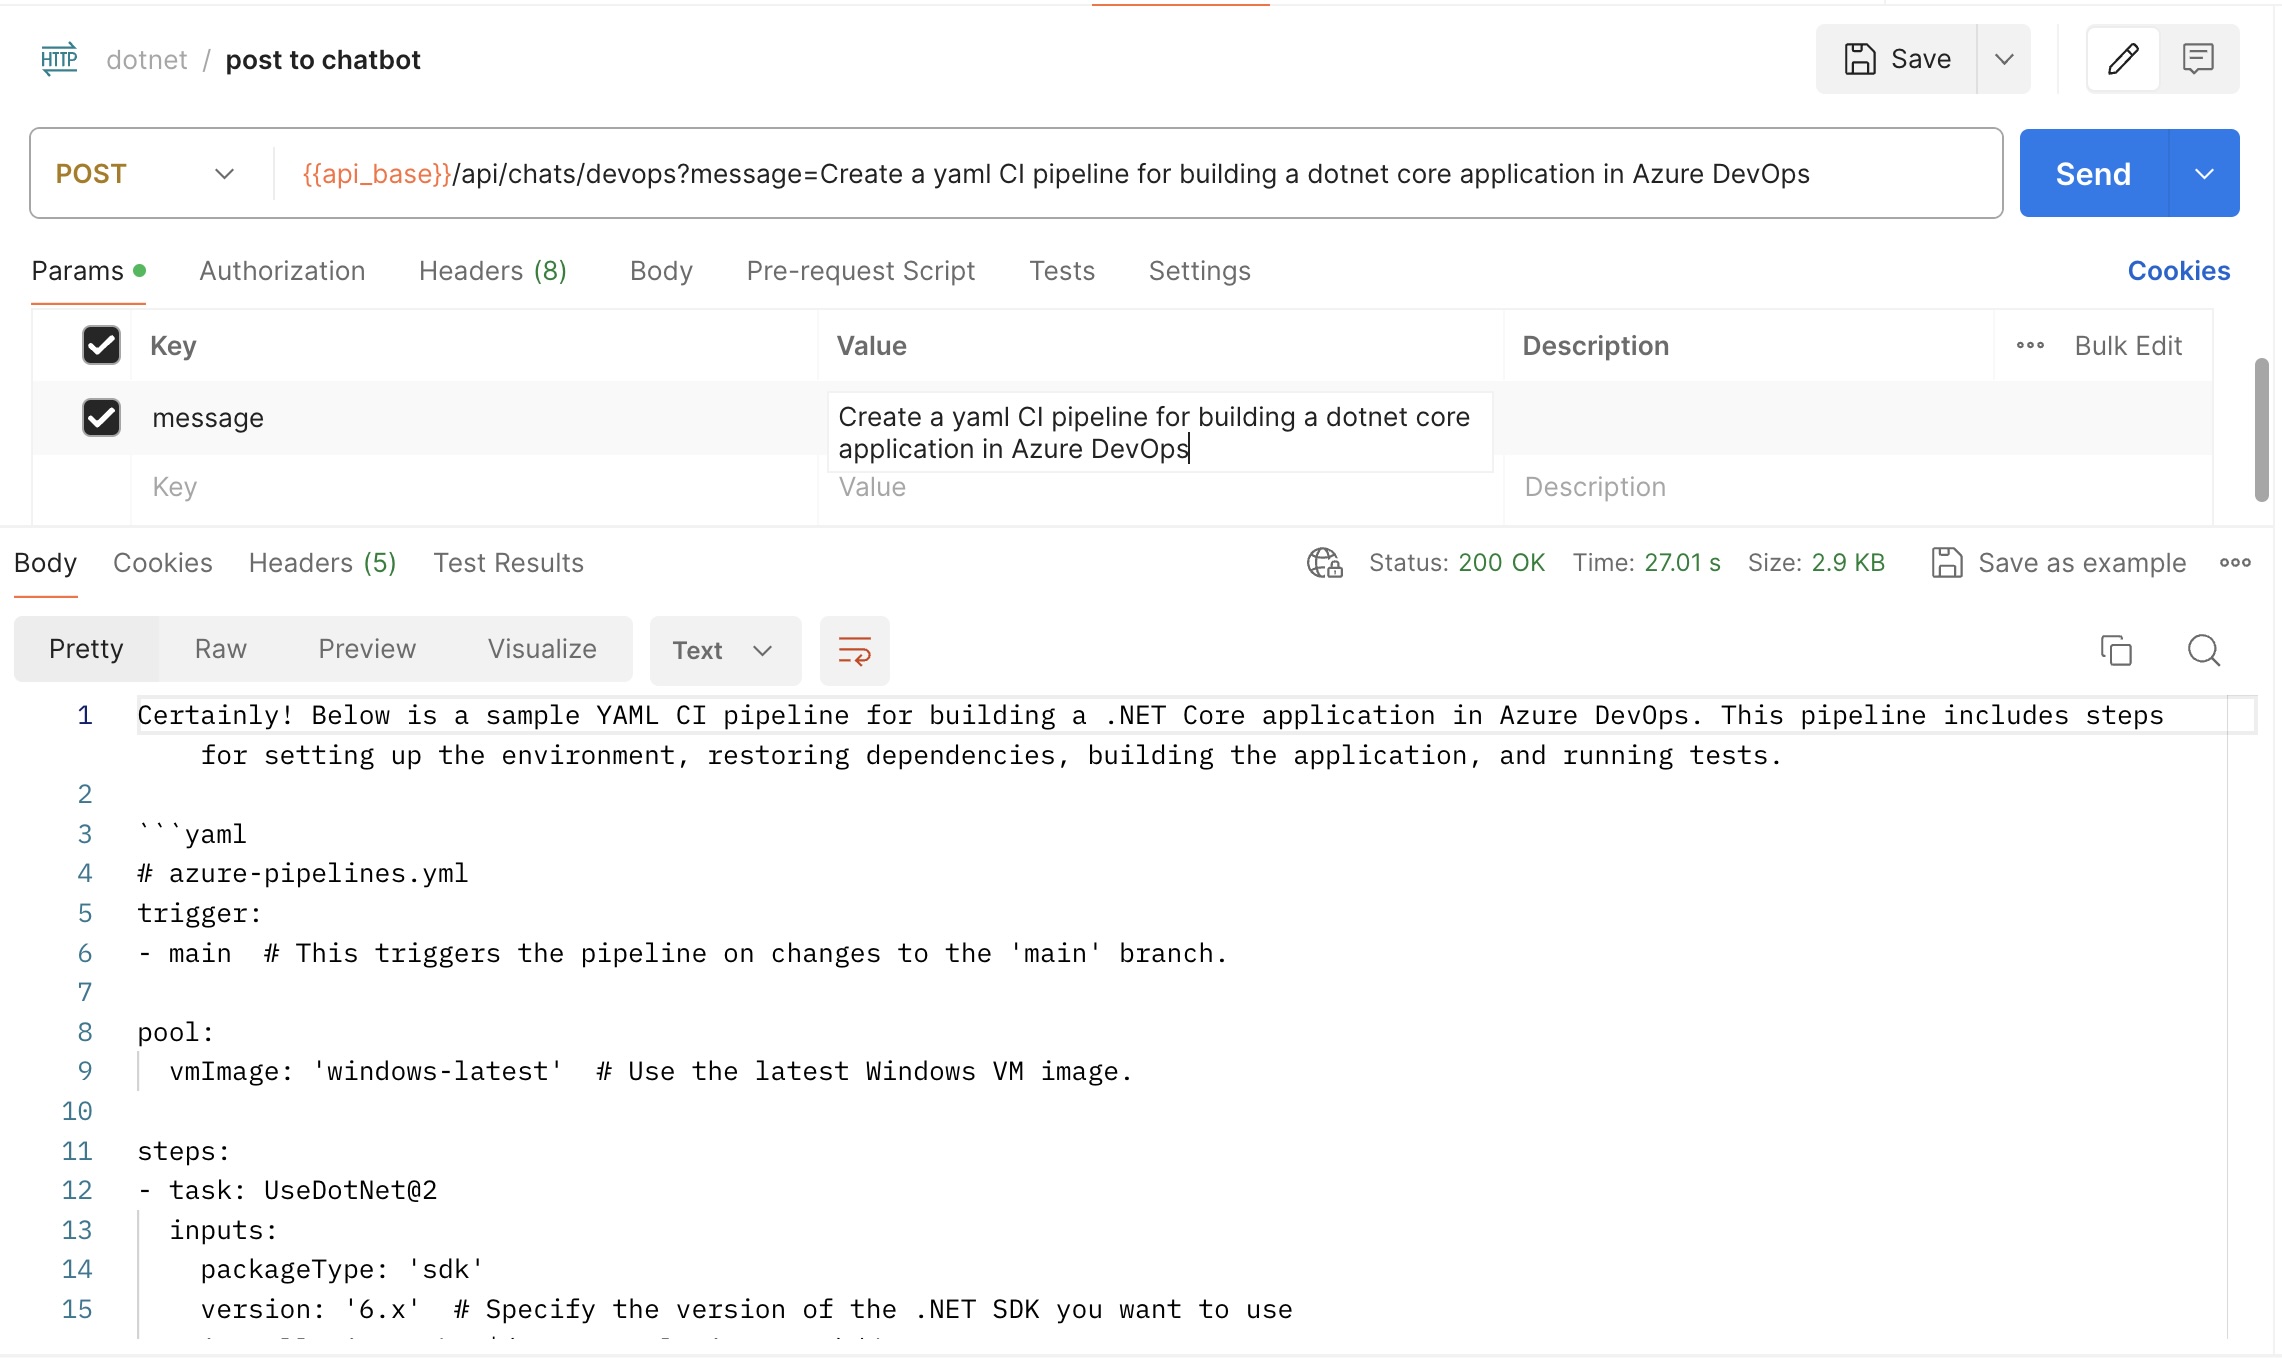
Post a message to the chat bot:
- HTTP Method: POST
- Endpoint:
/chats/{chatId} - Query param
message: "How to create a basic CI/CD pipeline with Azure DevOps?" - Response:
- Status Code: 200 (OK)
- Body: The response message from the chat bot
-
Get the current state of the chat:
- HTTP Method: GET
- Endpoint:
/chats/{chatId} - Response:
- Status Code: 200 (OK)
- Body: The current state of the chat, including the chat messages and other relevant information
-
Get text completions from the chat bot:
- HTTP Method: POST
- Endpoint:
/completions - Query param
Prompt - Response:
- Status Code: 200 (OK)
- Body: The completed text generated by the chat bot
See the chatbot in action
- Create chatbot
- First prompt
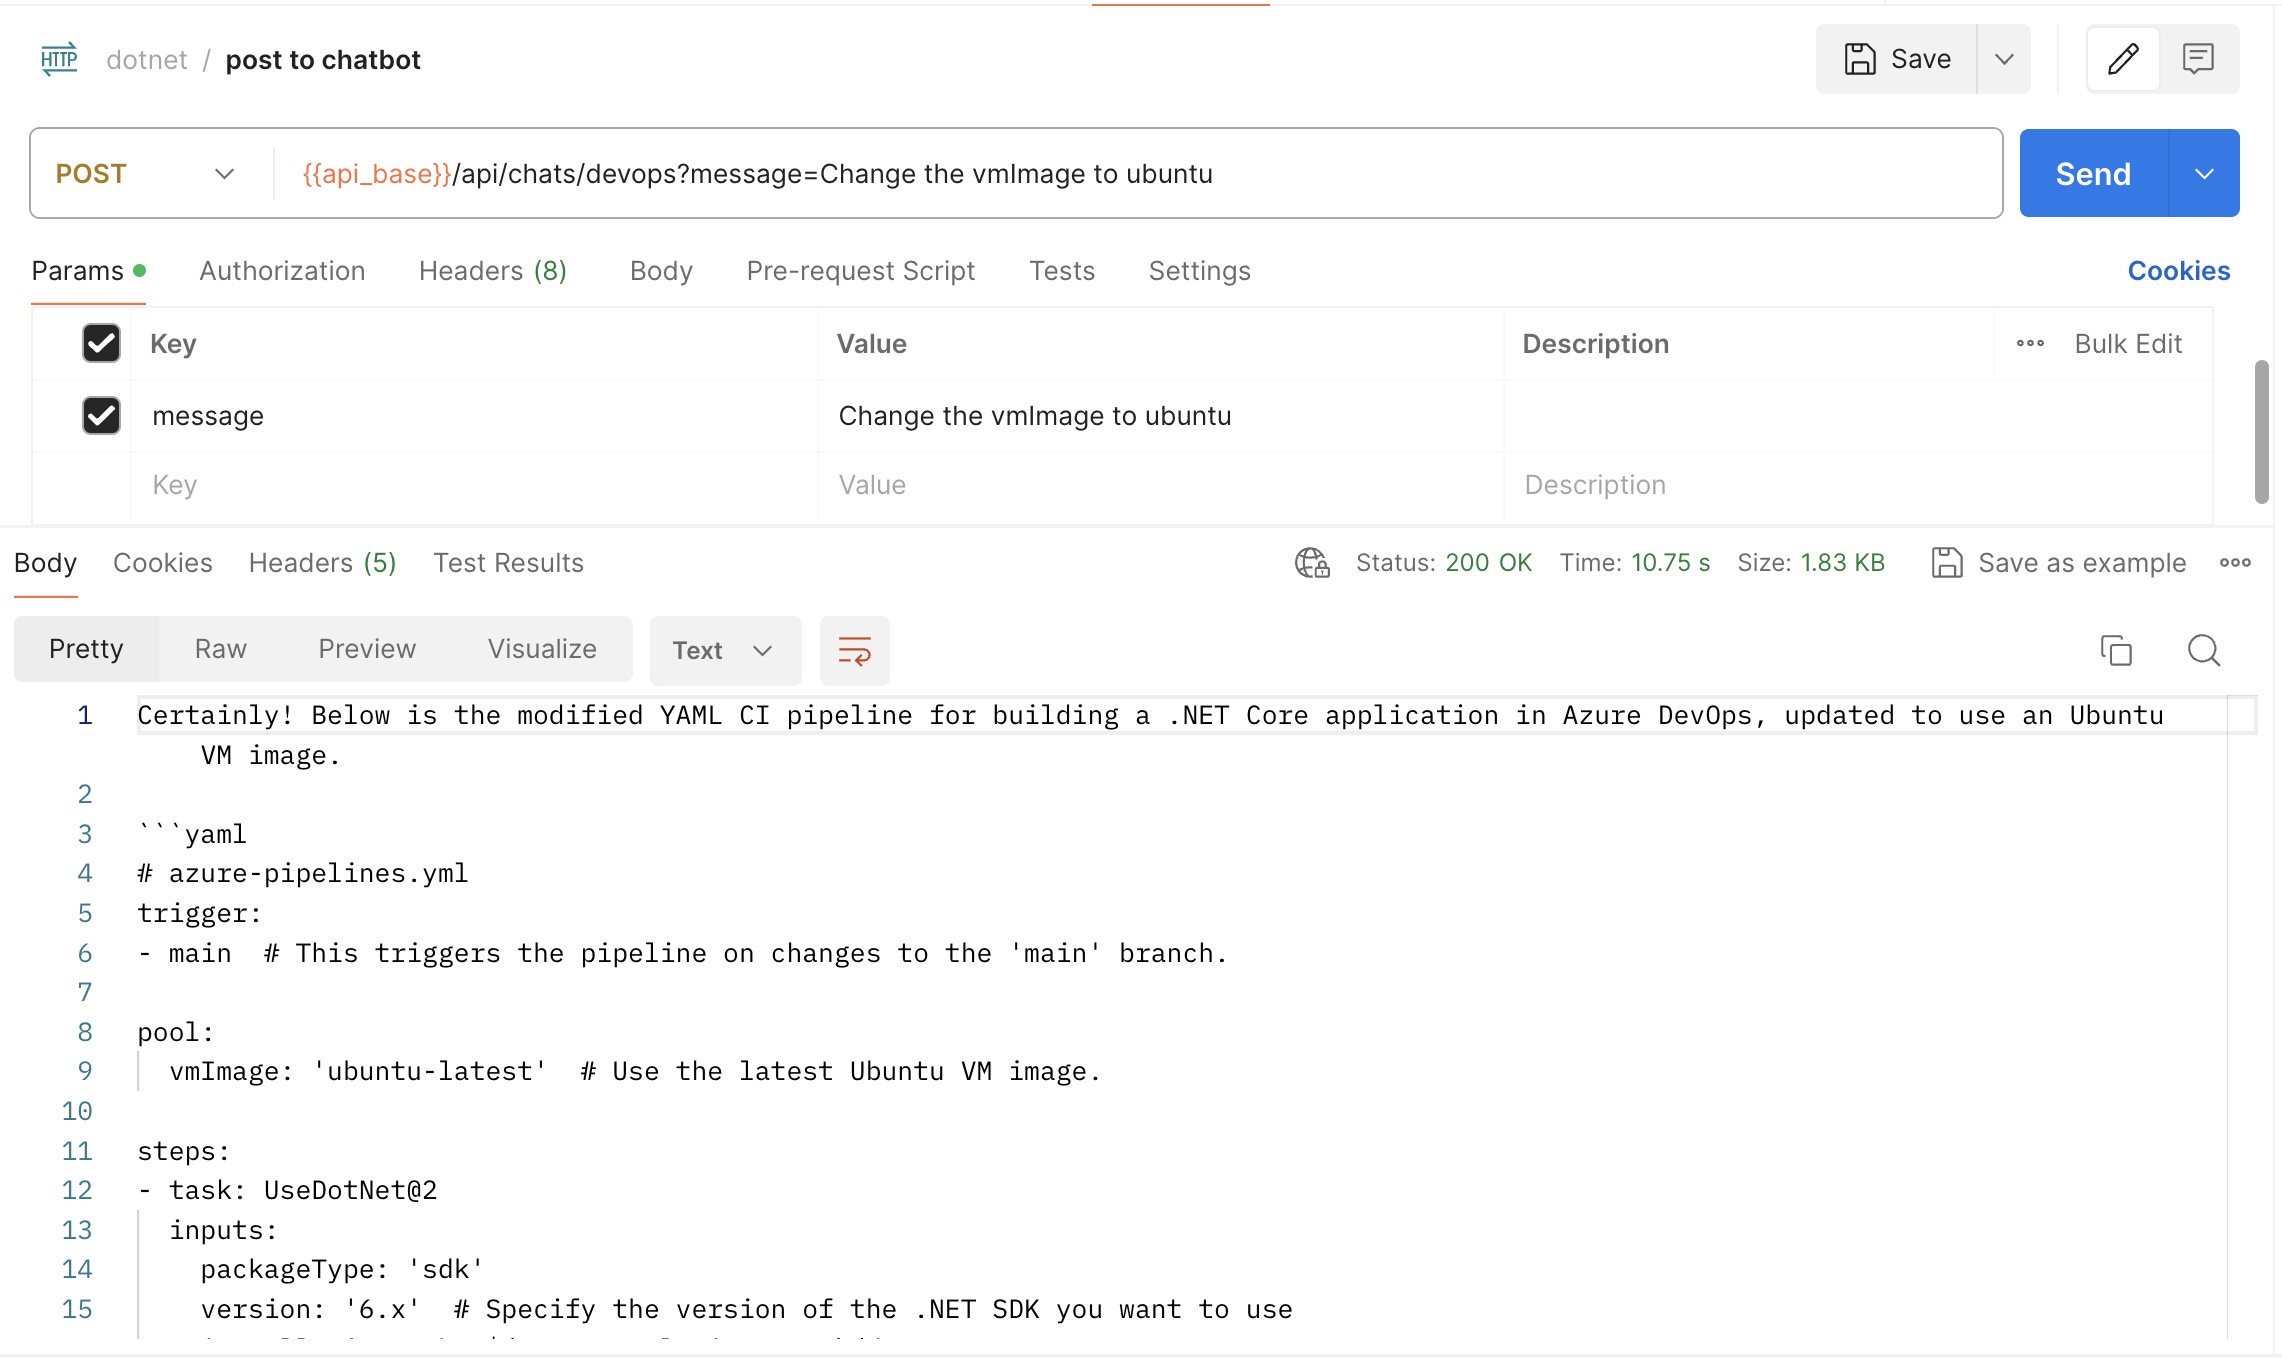
- Second prompt
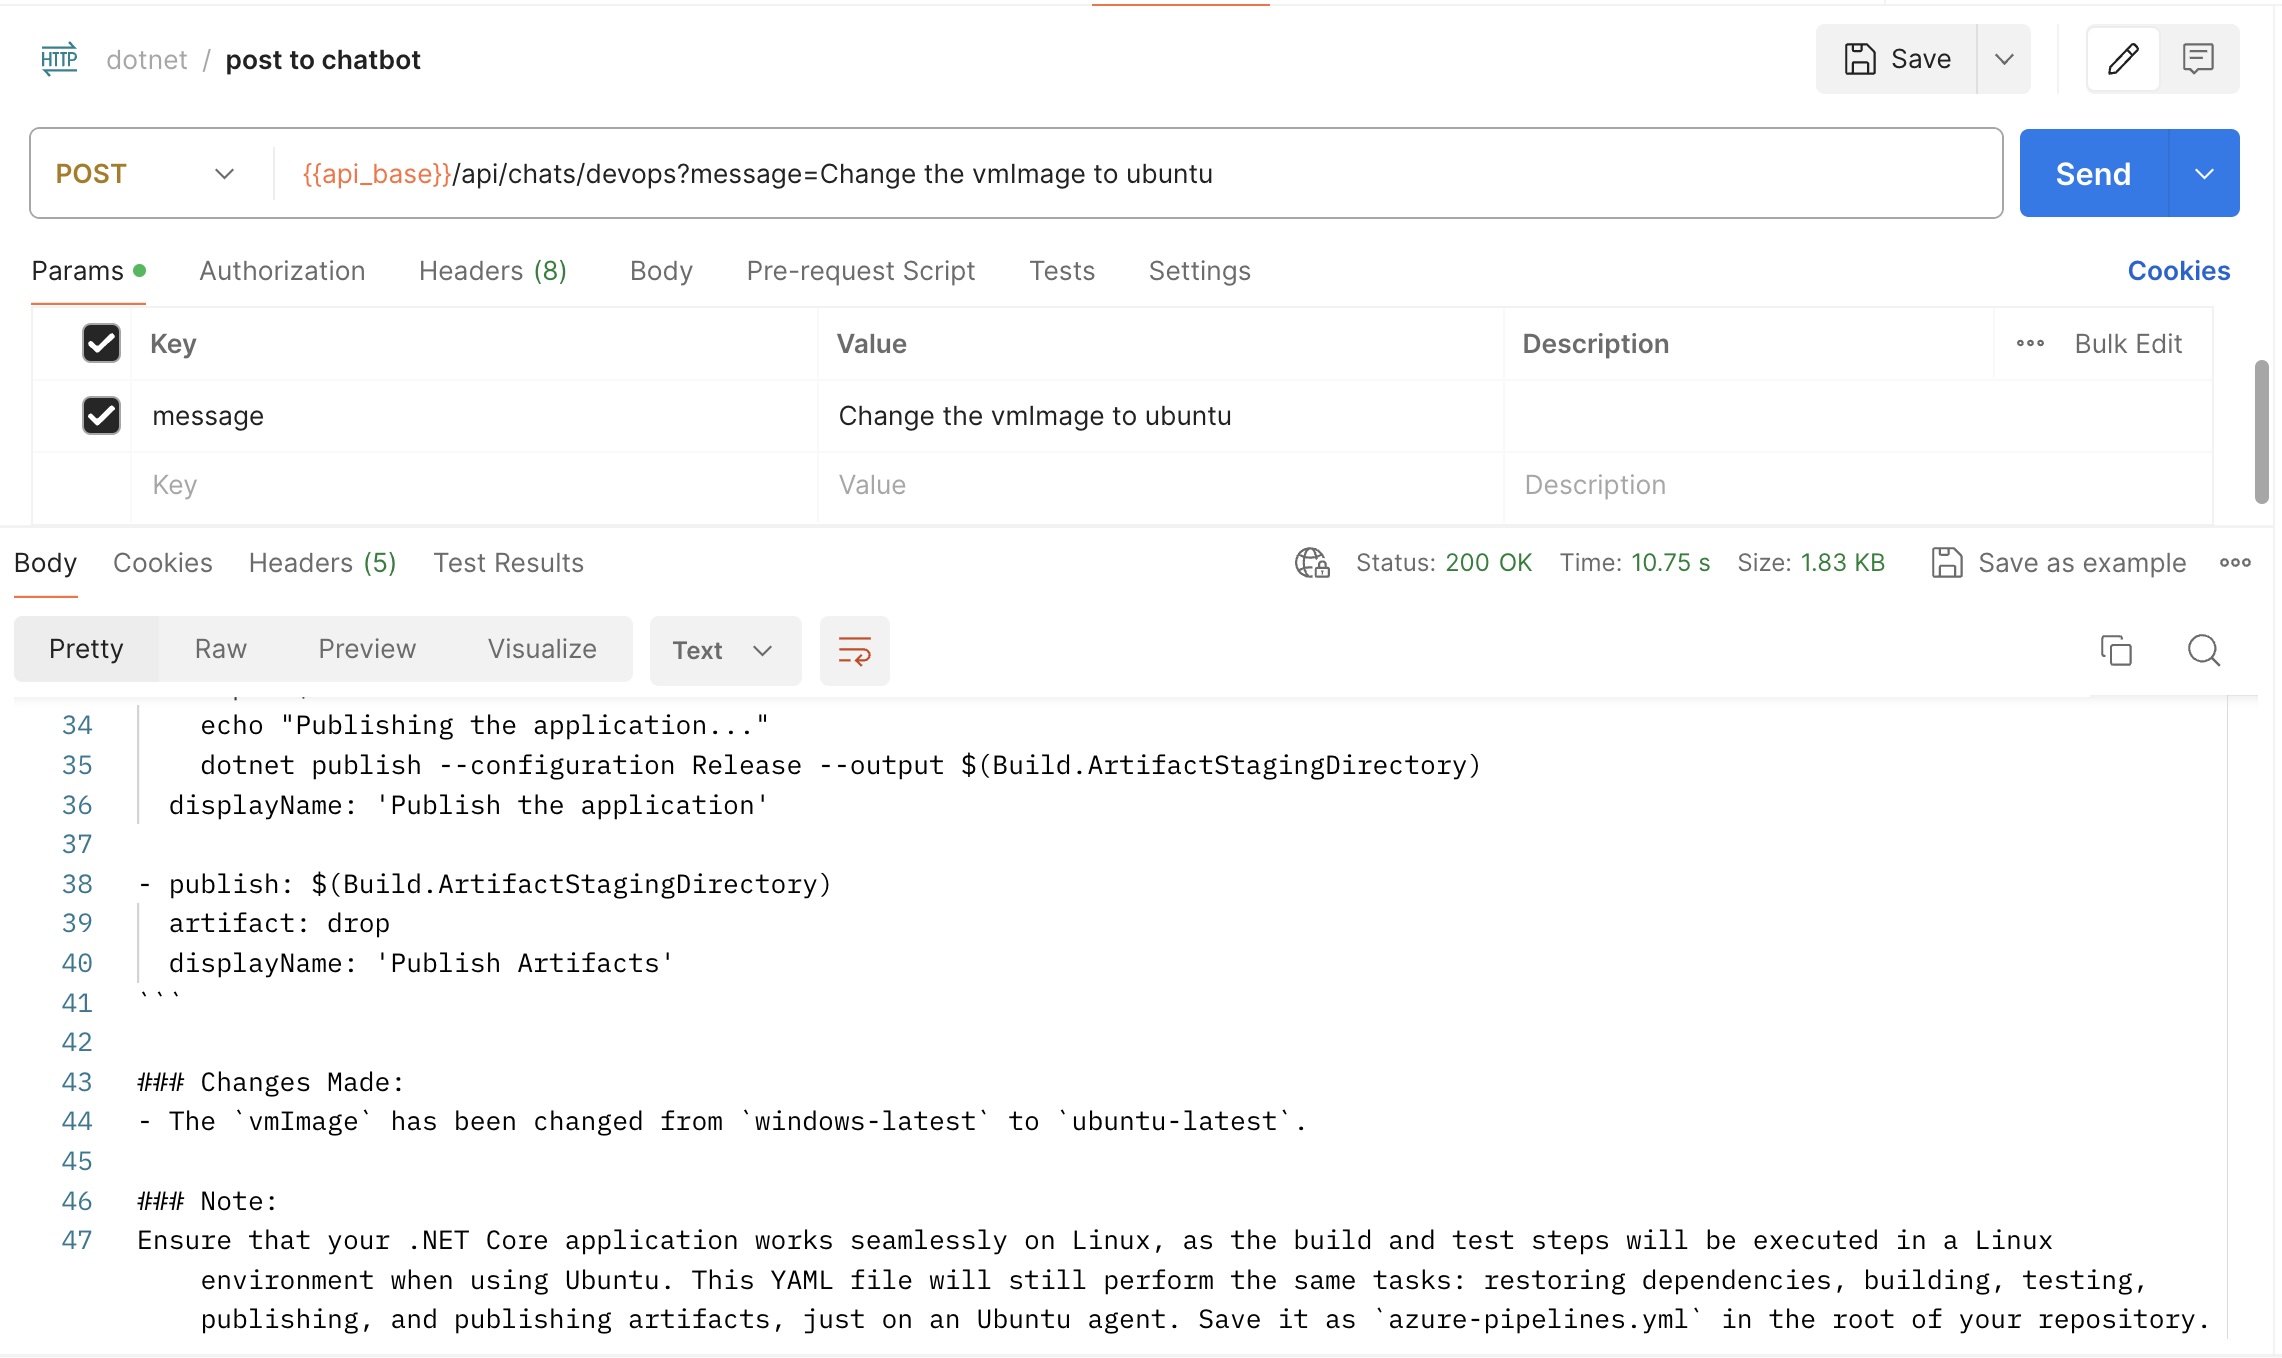
- Chat history
 1{
 2    "id": "devops",
 3    "exists": true,
 4    "createdAt": "2024-08-05T16:25:15.2174459Z",
 5    "lastUpdatedAt": "2024-08-05T16:31:25.7453816Z",
 6    "totalMessages": 5,
 7    "totalTokens": 1089,
 8    "recentMessages": [
 9        {
10            "content": "You are a helpful assistant. You act like a DevOps Engineer.",
11            "role": "system",
12            "name": null
13        },
14        {
15            "content": "Create a yaml CI pipeline for building a dotnet core application in Azure DevOps",
16            "role": "user",
17            "name": null
18        },
19        {
20            "content": "Certainly! Below is a sample YAML CI pipeline for building a .NET Core application in Azure DevOps. This pipeline includes steps for setting up the environment, restoring dependencies, building the application, and running tests.\n\n```yaml\n# azure-pipelines.yml\ntrigger:\n- main  # This triggers the pipeline on changes to the 'main' branch.\n\npool:\n  vmImage: 'windows-latest'  # Use the latest Windows VM image.\n\nsteps:\n- task: UseDotNet@2\n  inputs:\n    packageType: 'sdk'\n    version: '6.x'  # Specify the version of the .NET SDK you want to use\n    installationPath: $(Agent.ToolsDirectory)/dotnet\n\n- script: |\n    echo \"Restoring dependencies...\"\n    dotnet restore\n  displayName: 'Restore dependencies'\n\n- script: |\n    echo \"Building the application...\"\n    dotnet build --configuration Release --no-restore\n  displayName: 'Build the application'\n\n- script: |\n    echo \"Running unit tests...\"\n    dotnet test --configuration Release --no-build --verbosity normal\n  displayName: 'Run Unit Tests'\n\n- script: |\n    echo \"Publishing the application...\"\n    dotnet publish --configuration Release --output $(Build.ArtifactStagingDirectory)\n  displayName: 'Publish the application'\n\n- publish: $(Build.ArtifactStagingDirectory)\n  artifact: drop\n  displayName: 'Publish Artifacts'\n```\n\n### Explanation:\n\n1. **Trigger**: This pipeline triggers whenever there’s a push to the `main` branch.\n\n2. **Pool**: Specifies the use of `windows-latest` VM image, which has the necessary tools already installed.\n\n3. **Use .NET SDK**:\n   - The `UseDotNet@2` task installs the specified version of the .NET SDK.\n\n4. **Restore**: Executes `dotnet restore` to restore dependencies specified in the project files.\n\n5. **Build**: Executes `dotnet build` to compile the application. The `--no-restore` option ensures that it doesn’t attempt to restore packages again, as this was already done in the previous step.\n\n6. **Test**: Executes `dotnet test` to run unit tests on the code. The `--no-build` option means it doesn't compile the project again since it was already built in a previous step.\n\n7. **Publish**: Executes `dotnet publish` to package the application into the `$(Build.ArtifactStagingDirectory)`.\n\n8. **Publish Artifacts**: Publishes the output of the `dotnet publish` command so that it can be used in subsequent stages or releases.\n\n### Customization:\n- Adjust the .NET version in the `UseDotNet` step to match the version you're using (e.g., 5.x, 6.x, etc.).\n- Modify the project or test specifics according to your repository structure.\n- You can include additional steps for further analysis, like code quality checks, deployment steps, etc., as needed.\n\nSave this YAML as `azure-pipelines.yml` in the root of your repository to start using the pipeline.",
21            "role": "assistant",
22            "name": null
23        },
24        {
25            "content": "Change the vmImage to ubuntu",
26            "role": "user",
27            "name": null
28        },
29        {
30            "content": "Certainly! Below is the modified YAML CI pipeline for building a .NET Core application in Azure DevOps, updated to use an Ubuntu VM image.\n\n```yaml\n# azure-pipelines.yml\ntrigger:\n- main  # This triggers the pipeline on changes to the 'main' branch.\n\npool:\n  vmImage: 'ubuntu-latest'  # Use the latest Ubuntu VM image.\n\nsteps:\n- task: UseDotNet@2\n  inputs:\n    packageType: 'sdk'\n    version: '6.x'  # Specify the version of the .NET SDK you want to use\n    installationPath: $(Agent.ToolsDirectory)/dotnet\n\n- script: |\n    echo \"Restoring dependencies...\"\n    dotnet restore\n  displayName: 'Restore dependencies'\n\n- script: |\n    echo \"Building the application...\"\n    dotnet build --configuration Release --no-restore\n  displayName: 'Build the application'\n\n- script: |\n    echo \"Running unit tests...\"\n    dotnet test --configuration Release --no-build --verbosity normal\n  displayName: 'Run Unit Tests'\n\n- script: |\n    echo \"Publishing the application...\"\n    dotnet publish --configuration Release --output $(Build.ArtifactStagingDirectory)\n  displayName: 'Publish the application'\n\n- publish: $(Build.ArtifactStagingDirectory)\n  artifact: drop\n  displayName: 'Publish Artifacts'\n```\n\n### Changes Made:\n- The `vmImage` has been changed from `windows-latest` to `ubuntu-latest`.\n\n### Note:\nEnsure that your .NET Core application works seamlessly on Linux, as the build and test steps will be executed in a Linux environment when using Ubuntu. This YAML file will still perform the same tasks: restoring dependencies, building, testing, publishing, and publishing artifacts, just on an Ubuntu agent. Save it as `azure-pipelines.yml` in the root of your repository.",
31            "role": "assistant",
32            "name": null
33        }
34    ]
35}
Conclusion
By following this guide, you have successfully integrated Azure Functions with the OpenAI extension. This setup allows you to build powerful serverless applications that leverage the capabilities of OpenAI. You can now extend this setup to create more complex and interactive applications.
For more detailed information, refer to the Azure OpenAI Extension for Function Apps documentation.